
Installation Details
Procedures and materials described below are industry standards, so it is always recommended to consult a professional contractor to ensure pavers installed on your project adhere to local codes and best practices to ensure a successful install long term.
While 2CM (3/4”) thick pavers are the industry standard and ideal for most applications, where commercial vehicular traffic is present 3CM (1 1/8”) thick pavers are recommended. On flat concrete slabs around residential pool decks and patios, 1CM (3/8”) exterior tiles are an option.
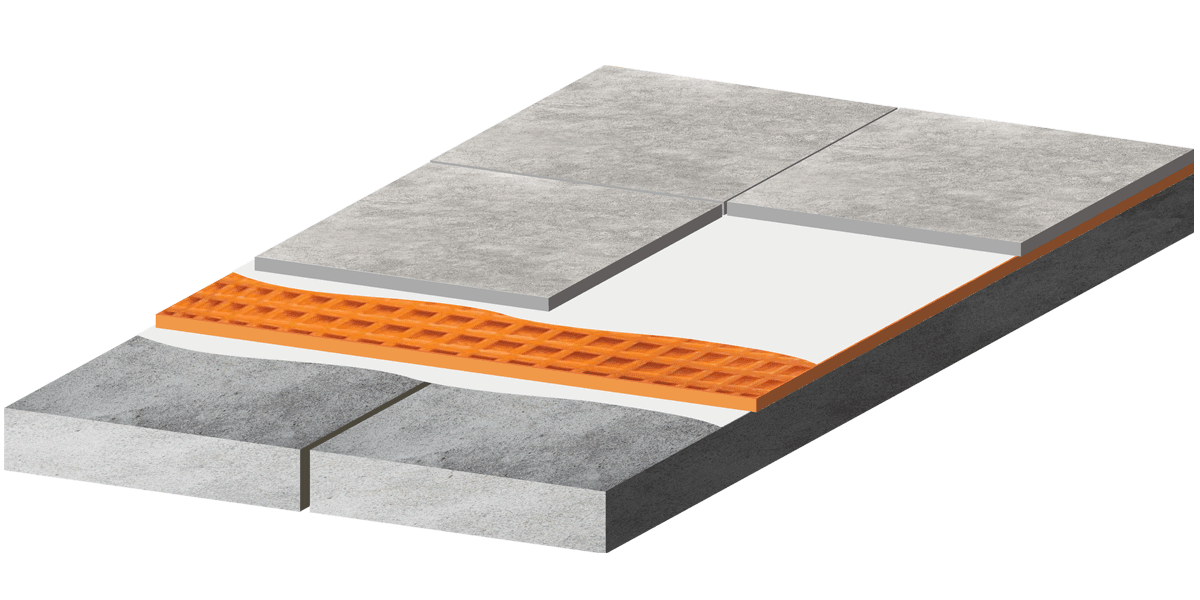
Mortar Application over Rooftop topping slab :
Over top the sloped reinforced concrete rooftop protected with a waterproof membrane and foam insulation, a ‘topping slab’ of lesser slope is poured.
Another waterproofing layer is often applied and topped with drain mat.
Large format porcelain pavers are applied with mortar and grouted over top the drain mat.

Dry lay in grass:
Using a heavy duty metal rake scrape off any high point created by dirt and rocks to create a level surface.
Lay 2CM or 3CM paver directly on leveled grass surface.

Dry lay in dirt with grass removed:
Using a square shovel scrape off grass layer to expose soil.
Remove up to 1” of soil.
Lay 2CM or 3CM paver in prepared soil bed.

Dry lay on permeable gravel bed:
Excavate approximately 12” into soil.
Line soil bed with geotextile fabric to contain gravel layers while letting water pass through.
Lay a 6” base of 1.5”-2.5” diameter construction gravel on fabric.
Lay 4” of 3/4”-1” diameter crushed stones or driveway gravel over the base layer.
Lay a final 2” of 1/2” diameter pea gravel.
Set 2CM or 3CM pavers on pea gravel with 3/16” spacers separating them to ensure optimum water drainage.

Dry lay on prepared sand bed:
Excavate approximately 5-7” into soil.
Line soil bed with geotextile fabric to contain gravel and sand layers while letting water pass through.
Lay 4-6” of road base crushed gravel on fabric.
Lay 3/4” bedding sand over base, do not compact.
Set 2CM or 3CM pavers on sand with 3/16” spacers separating them to ensure optimum water drainage.

Dry lay over sand:
Excavate approximately 4” into soil.
Line soil bed with geotextile fabric to contain sand while letting water pass through.
Lay 4” of sand on fabric and compact.
Set 2CM or 3CM pavers on sand with 3/16” spacers separating them to ensure optimum water drainage.

Dry lay in sand over concrete:
Install containment such as plastic landscape edging around concrete perimeter to contain sand and pavers.
Line concrete slab with geotextile fabric to contain sand while letting water pass through.
Lay 1” sand bed on fabric.
Set 2CM or 3CM pavers on sand with 3/16” spacers separating them to ensure optimum water drainage.

Mortar application over reinforced concrete:
In many cases it is recommended to install an uncoupling membrane over the concrete slab to avoid paver damage caused by concrete expansion and contraction from moisture and humidity fluctuations.
Use appropriate mortar to adhere 1CM, 2CM or 3CM pavers to membrane.
Maintain a 3/16” grout joint between pavers.
Fill grout joint with polymeric sand or other appropriate grout.

Installation on deck joists:
Set FRP Grating over joists and adhere using ‘M’ clips. Fiberglass reinforced plastic grating is long lasting, has very little deflection, and allows water to easy flow through. An alternative to FRP grating is plywood sheeting protecting with a waterproof membrane such as EPDM or TPO.
Set 2CM or 3CM pavers on low height, hard rubber paver pads containing 3/16” spacer tabs to ensure efficient water drainage off paver surface.

Elevated on low height paver pads over hard substrate:
Set 2CM or 3CM pavers over hard surfaces like concrete using rubber paver tabs designed for slightly elevating pavers off a substrate and spacing them 3/16” for efficient water drainage off paver surface.
Use one layer of pads when pavers are to follow the slope of the substrate, or stack and shim pads as necessary to level rows of pavers over sloping substrates.

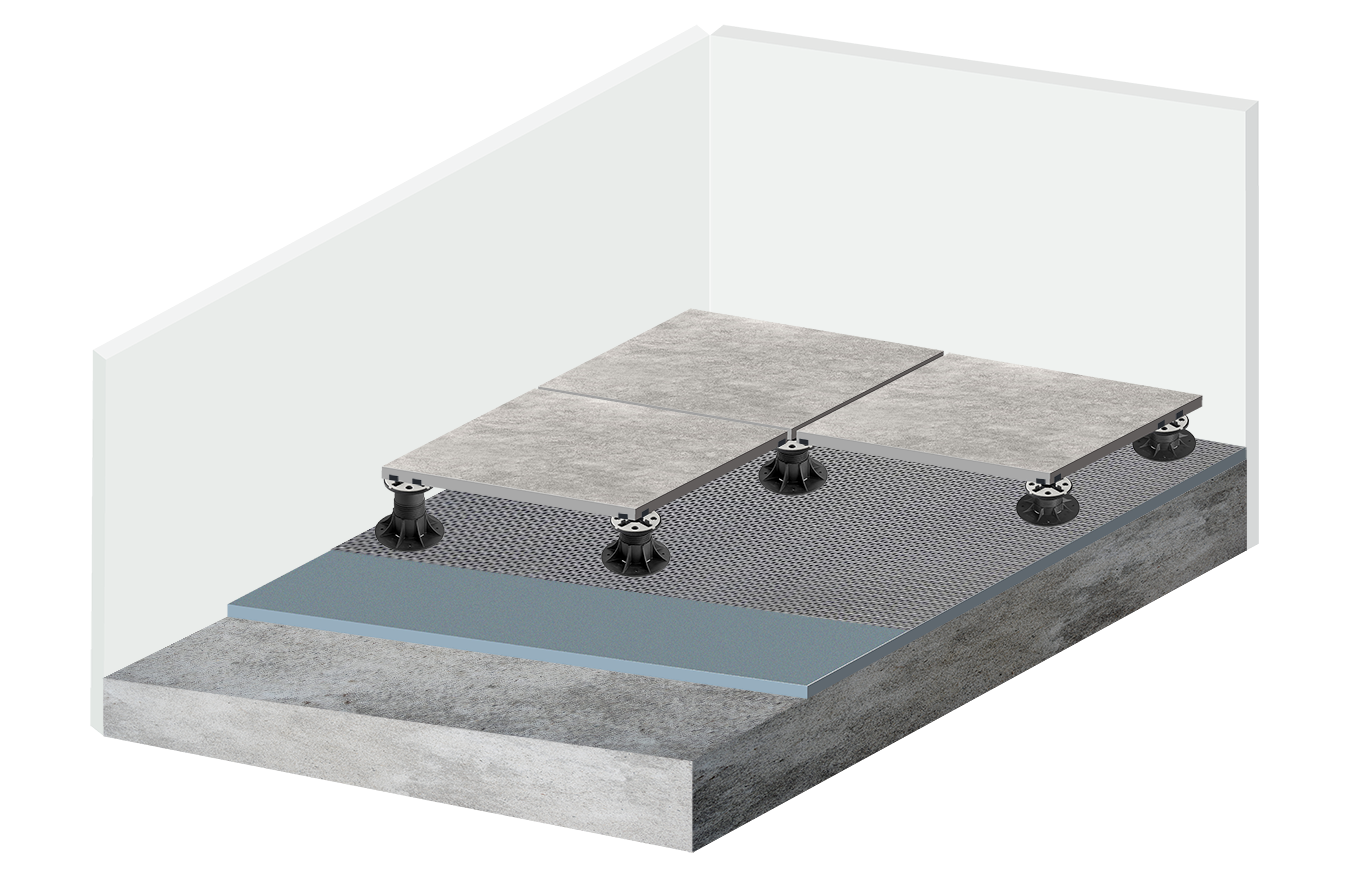
Elevated 1”-30”+ on adjustable height pedestals over hard substrate:
Level 2CM or 3CM pavers over hard, sloping surfaces like concrete using adjustable height pedestals designed for elevating pavers off a substrate and spacing them 3/16” for efficient water drainage off paver surface.
Elevated 1”-30”+ on adjustable height pedestals over hard, sloping substrate:
Elevate 2CM or 3CM pavers on adjustable height pedestals over sloping above-grade environments such as flat roof tops, balconies and terraces.
Adjustable height pedestals sit directly waterproof membrane.
Adjust pedestal heights to level the field of pavers at preferred height above substrate.